How the picture is made
The probe sends short pulses of sound into the body and listens for the echoes. Tissues that send back a lot of sound look bright (hyperechoic), tissues that send back little look grey (hypoechoic), and fluid, which sends back almost none, looks black (anechoic).
Sound cannot cross air or bone, so behind them there is a black acoustic shadow. That is why you need gel between probe and skin, and why you can't see through ribs or bowel gas.
| Looks | Word | Examples |
|---|---|---|
| Black | Anechoic | Blood in vessels, local anaesthetic, cysts, effusions |
| Dark grey | Hypoechoic | Muscle, nerve roots in the neck, fat lobules |
| Bright white | Hyperechoic | Fascia, tendons, peripheral nerves, bone surface, pleura, the needle |
Choosing the probe
- Linear, high frequency (about 6–15 MHz): sharp detail down to about 4–5 cm. The probe for most blocks: interscalene, supraclavicular, axillary, femoral, adductor canal, rectus sheath, popliteal in thin patients.
- Curved (curvilinear), low frequency (about 2–5 MHz): reaches 6–15 cm but with less detail and a wider, fan-shaped view. For deep blocks and larger patients: erector spinae at depth, quadratus lumborum, gluteal and anterior sciatic, lumbar plexus, neuraxial.
- Small 'hockey-stick' linear: for small areas such as the wrist, ankle, face and children.
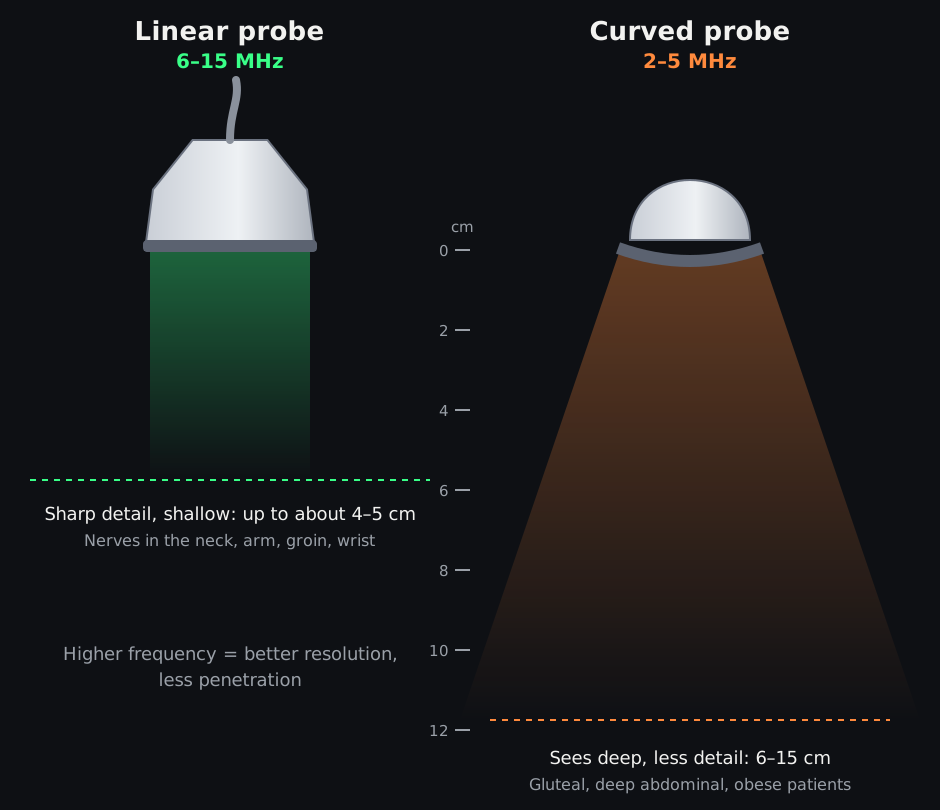
Higher frequency gives finer detail but does not reach as deep.
Original diagram © Nerve Blocks.
Getting a good picture
- Depth: set it so the target sits in the middle of the screen, with a little of what lies beneath it in view (for example the pleura or bone). Too deep makes everything small; too shallow hides structures underneath.
- Gain: overall brightness. Set it so fluid is black and fascia is bright, not grey everywhere. Too much gain hides the needle and fine fascial planes. Time-gain compensation (TGC) sliders brighten deeper layers without washing out the top.
- Focus: put the focal zone at or just below the target, where the beam is narrowest and the picture sharpest (not all machines have it).
- Orientation: the marker on the screen (usually top left) matches the dot or ridge on one side of the probe. Check it by touching one end of the probe before you start, every time.
- Presets: use the nerve or musculoskeletal preset, and colour Doppler to find vessels in the needle path.

Know the four controls you'll use every time: depth, gain, focus and the orientation marker.
Original diagram © Nerve Blocks.
Moving the probe
- Hold the probe low down, near the skin, with a relaxed grip. Rest the little finger or the side of your hand on the patient so the probe can't drift.
- Slide to follow a nerve up and down a limb. Tilt to make a nerve or the needle brighter: the beam must hit it at 90° for the best echo (anisotropy). Rotate to switch between short- and long-axis views.
- Rock (heel-toe) to see the needle better when it's steep. Compress gently to close veins and bring structures closer; too much pressure squashes vessels and can hide them.
- Start with a broad sweep to find a big landmark (artery, bone, muscle), then home in on the nerve.

Small, slow movements, one at a time. Most blocks need slide, tilt and rotate.
Original diagram © Nerve Blocks.
Artefacts to know
- Acoustic shadow: black area behind bone or calcium.
- Posterior acoustic enhancement: bright area behind fluid-filled structures such as arteries and cysts. Don't mistake it for a nerve (a classic trap under the axillary and femoral arteries).
- Reverberation: evenly spaced bright lines behind a strong reflector, such as the needle, pleura (A-lines) or trachea.
- Anisotropy: a nerve or tendon looks bright when the beam hits it at 90° and dark when angled. Tilt the probe to find the best view.
How to practise
- Scan colleagues and volunteers: learn the normal anatomy first, so you notice the unusual.
- Use the same routine every time: set up, landmark, target, path, Doppler.
- Save and review your images, and compare them with the illustrations and scans on our block pages.
References
- Marhofer P, Chan VWS. Ultrasound-guided regional anesthesia: current concepts and future trends. Anesth Analg 2007;104:1265–9. PubMed